Tuesday, 28 April 2015

Post Production


Before we broke up for Easter we had booked out the avid editing suite so when we came back we could start ASAP however there was a mix up with the booking and Simon Allmark had booked the suite from 13th- 28th March instead of 13th-28th April so we just rebooked with Simon all was sorted. Lucy had done a rough cut of the dance video  over Easter.

Rough Cut below:


The rough cut being  made on premiere pro we had to transcode the video so that it would be editable in avid. So we exported the rough cut into different formats theses formats being EDL, AAF etc. So we could open these formats into avid. However these formats didn't work. Tom on his Mac took the rough cut into software called Da Vinci resolve and transcoded the rough cut, transcoding the video through Da Vinci resolve worked. We were able to open the rough cut in avid however we had to relink all the footages Lucy had in the rough cut which took a whole morning relinking and importing the footages into avid

Wednesday, 25 March 2015

Elysian Shoot (Runner)

25th March 2015


Helping out on the set of the elysian dance shoot being a runner on set.


Helping out on this set has been fun and enjoyable. Wanted to post this as helping out I may of have just been a runner also ( assisting Tom on camera )but would like to think that my helping had benefitted them greatly.

Monday, 23 March 2015

Evaluation - Short but brief


I believe this unit has really helped improve my knowledge of photography through the understanding of how photos are edited and managed and organized in a professional manner.  And how the methods we have been taught I will continue to use these skills in my future works. Personally over the weeks I have gained and have learnt a lot through this unit, i.e. how camera raw works, to how in my previous unit maps and journeys I took most of my photos in raw but didn’t know how to work with the file or its capabilities, through this unit it has taught me how raw works.
 
Not just that but taking this unit has taught me how to work with clients and cater their needs, and I now know how to take professional photos in the style of classical artist Rembrandt and Carravacio which will come in handy some day.  Some of my photographs may not seem or look professional in some of photography tasks which is one of the things I could have improved upon. However the main aspects I have learnt from this is I know I’ve already said it but it is to edit photos in a professional way, organize them in a professional and efficient way and how to maintain an organize clients needs in the photography world.

Task 2

task two we had to create primary and secondary catalogues in light room The primary being of about 20-50 images, images that I had edited in various ways then organized them through key words, color,  photo formats etc.


On some of the images I had edited them through develop panel and then were able to take the some of the photos into Photoshop and edit them as well once edited in Photoshop the change is automatically made in Light room.


The secondary catalogue being only partial images from the primary catalogues.
 
The second catalogue being reated.


Task 1


For task one having been asked to take 5 photos In different lightings and then make adjustments top them the professional way via Photoshop through the camera raw.

 A few of my final images I have chosen to edit. Screenshots showing the process how edited some of the images.
 
making adjustments through the camera raw menu as this was like being behind the camera.
making mask layers masking out the bits I didn’t want. Then sharpening the image the professional way by going to filter > custom> high pass> sharpening the image to about 1.5. Then changed the blending mode to overlay giving  a subtle change.

before  above

after below repeating the process above for the other four images.


Photography workshop- printing


18th March Wednesday 2015

Because this session was moved to a later date a few days before the hand-in. In this workshop we had been shown the professional way to print making sure are final prints is the exact match as that to our monitor. 

We calibrated our monitors manually by going to the system preferences > display> color> calibrate. Adjusting the different ambient light settings on the monitor best suited. After the calibration we would get a before and after display showcasing the differences. Reasons for calibrating a monitor or laptop before printing because if your working with high quality images calibrating gives your monitor a better rendition of colour.

 Printing my Final two images for task 4

Within this workshop because we had not that much time I  managed to print one of my final two images within this session, and managed to print the second image the following day. As the friday the 20th is my shooting day for Tom, Lucy and myselfs dance video.


my final two prints the first being of Lucy taken in the style of Carravacio. Using the following color management profile.

R2880 photo glossy profoto rgb / colormunki imac calibrated imac/ photoshop cc manged spr 2880 photo glossy ./ rendered relative colormetric black 5760 16 bit.


The second final print taken from the view of my kitchen.   Using the flowing color management 

 R2880 photo profoto rgb/ photoshop cc managed spr 2880 photo glossy / rendered relative colormetric black point 5760 16 bit.


editing the image in Photoshop adding subtle adjustments to make the photo more interesting.


Sunday, 22 March 2015

Photography Workshop - Portraits

17th February 2015

We had a studio session learning the essential skills needed for lighting a subject and using studio equipment to enable us how to capture professional photography portraits. The main focus was to learn how narrow and broad lighting is captured and used. This technique is used in many portrait photography to enhance the quality of the portrait or to either create a in-depth aesthetically pleasing image, or to bring out character in the face.
Before we started to take photographs we looked at examples of narrow and broad lightning:


This example of Scarlett Johansson depicting narrow lighting shows how it highlights her cheekbones and shows detail to her neckline, and the light in the eyes makes her look more aesthetically pleasing and captivating to gaze at.


This example of broad lighting shows how it highlights the features as a whole a lot more, rather than lining them with shadow, and how broad lighting illuminates the portion of the face closet to the camera.  

Then we took our own photographs :
Broad Lightning

Narrow Lightning
Now that we had gotten to grips with Broad and Narrow lightning , we started looking at this type of lighting in context to classical paintings. Aftet this short excercise we looked at broad lighting used by Rembrandt:
 
 Rembrandt was a Dutch painter that used broad lighting in most of his commissioned portraits. This is so that he could have consistency across his works, allowing him to capture the character of the person in the painting. This style of broad lighting not only casts a shadow on one side of the face, but also catches the light in both eyes as they look towards the frame. We were 
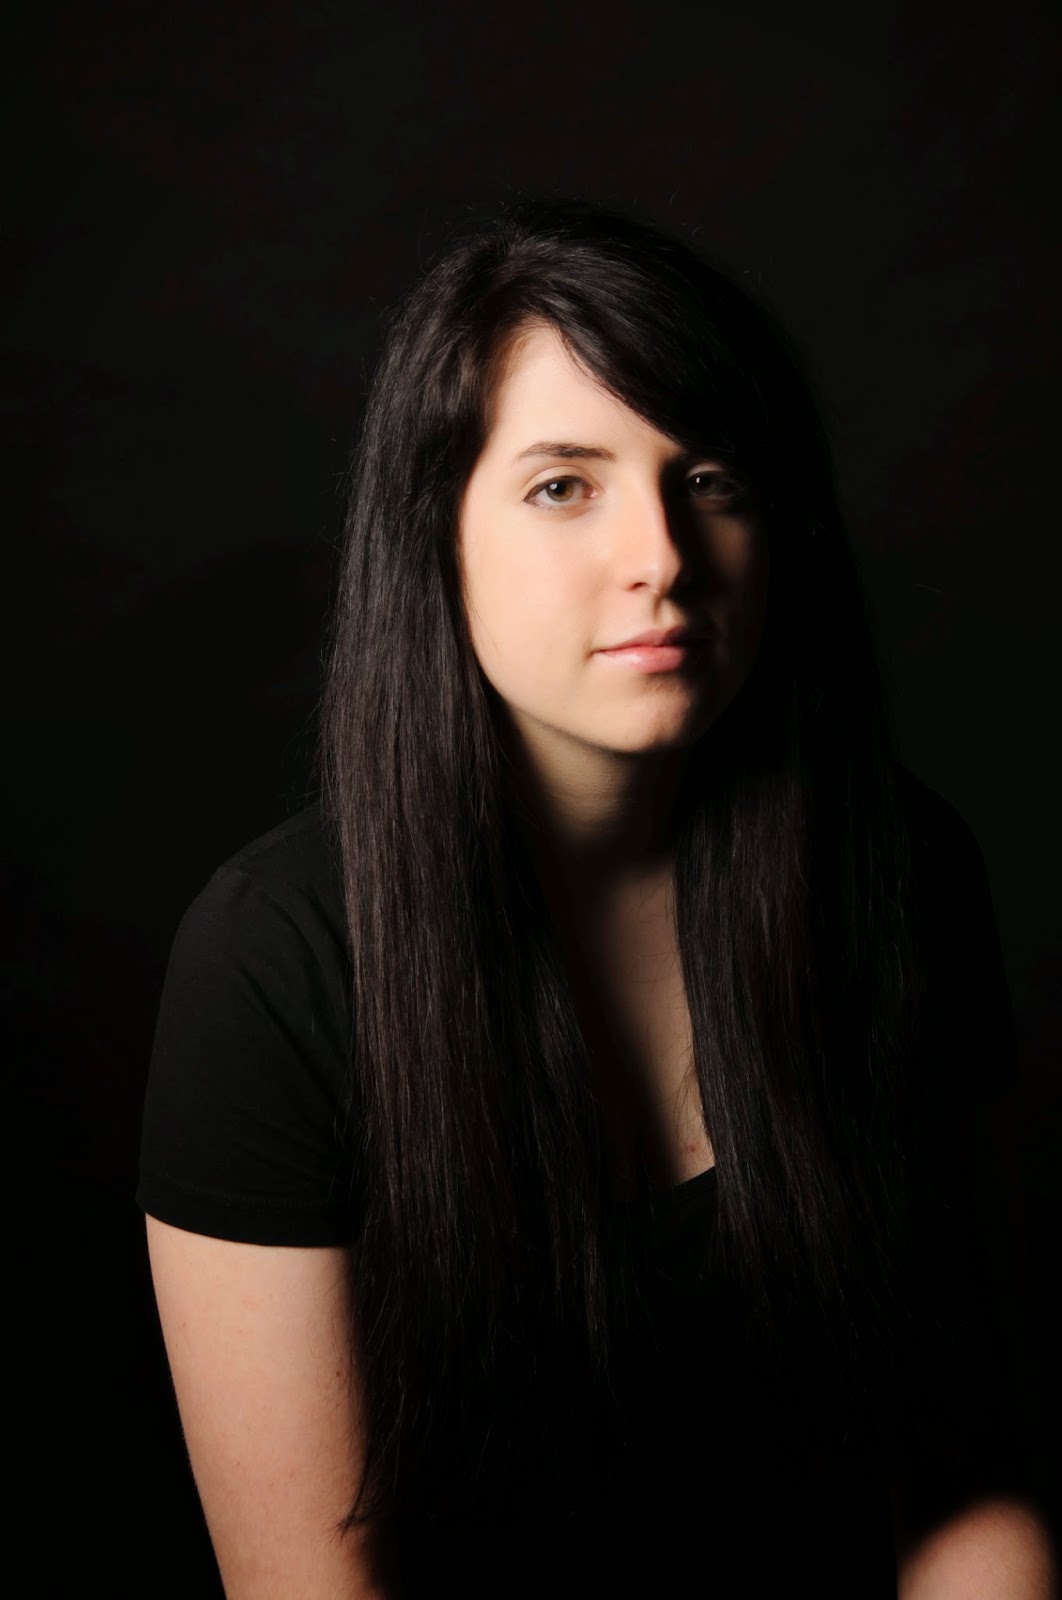
given the task of using one light to achieve this effect: 

This photo being taken outside of the workshop when Julia had gladly agreed to be my subject.

This effect took a while to get right, having to constantly ove the subject and the light around to get the right balance between the two. What I noticed was essential to this photograph was that the subject could not face directly towards the character as that is quite commercial, but also quite imposing and also how not looking directly at the character added a certain element to the photograph giving the photograph that a little edge.

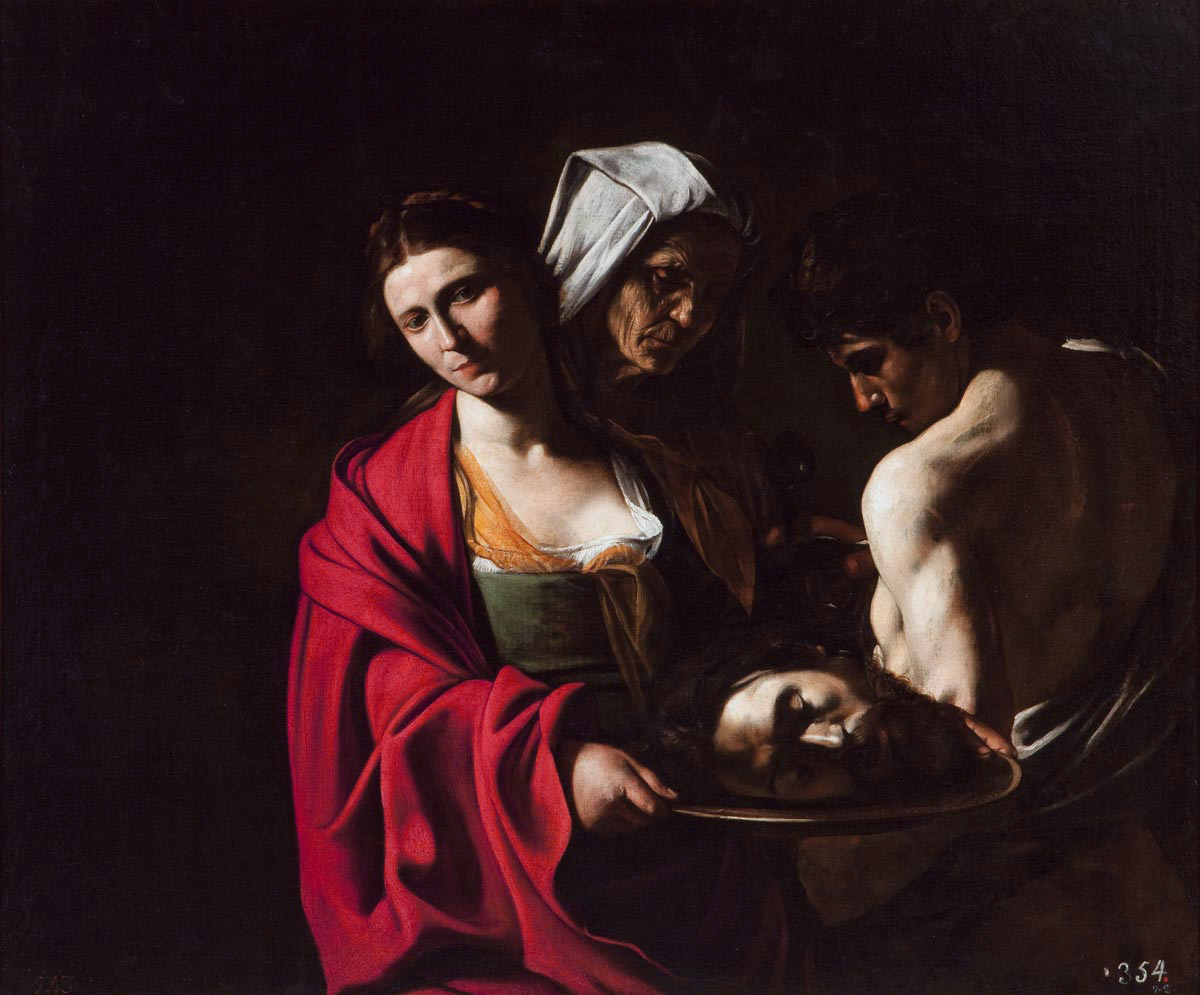
The second style we looked at was the style of Caravaggio, who was a Renaissance painter.  He used narrow lighting from high positions to create heavy shadows in his scenes, adding an dramatic heavy tension to his work.

For this excercise we had photographed students who had happliy volunteered  to act as our subjects as these where students from BA photography second years.


 What really excites me about this style of photography is the lightning how you could highlight te facial expressions really easily and get a twinkle in the eye which I feel makes the photograph more epic adding to the old fashioned painting style.