Wednesday 25 March 2015

Elysian Shoot (Runner)

25th March 2015


Helping out on the set of the elysian dance shoot being a runner on set.


Helping out on this set has been fun and enjoyable. Wanted to post this as helping out I may of have just been a runner also ( assisting Tom on camera )but would like to think that my helping had benefitted them greatly.

Monday 23 March 2015

Evaluation - Short but brief


I believe this unit has really helped improve my knowledge of photography through the understanding of how photos are edited and managed and organized in a professional manner.  And how the methods we have been taught I will continue to use these skills in my future works. Personally over the weeks I have gained and have learnt a lot through this unit, i.e. how camera raw works, to how in my previous unit maps and journeys I took most of my photos in raw but didn’t know how to work with the file or its capabilities, through this unit it has taught me how raw works.
 
Not just that but taking this unit has taught me how to work with clients and cater their needs, and I now know how to take professional photos in the style of classical artist Rembrandt and Carravacio which will come in handy some day.  Some of my photographs may not seem or look professional in some of photography tasks which is one of the things I could have improved upon. However the main aspects I have learnt from this is I know I’ve already said it but it is to edit photos in a professional way, organize them in a professional and efficient way and how to maintain an organize clients needs in the photography world.

Task 2

task two we had to create primary and secondary catalogues in light room The primary being of about 20-50 images, images that I had edited in various ways then organized them through key words, color,  photo formats etc.


On some of the images I had edited them through develop panel and then were able to take the some of the photos into Photoshop and edit them as well once edited in Photoshop the change is automatically made in Light room.


The secondary catalogue being only partial images from the primary catalogues.
 
The second catalogue being reated.


Task 1


For task one having been asked to take 5 photos In different lightings and then make adjustments top them the professional way via Photoshop through the camera raw.

 A few of my final images I have chosen to edit. Screenshots showing the process how edited some of the images.
 
making adjustments through the camera raw menu as this was like being behind the camera.
making mask layers masking out the bits I didn’t want. Then sharpening the image the professional way by going to filter > custom> high pass> sharpening the image to about 1.5. Then changed the blending mode to overlay giving  a subtle change.

before  above

after below repeating the process above for the other four images.


Photography workshop- printing


18th March Wednesday 2015

Because this session was moved to a later date a few days before the hand-in. In this workshop we had been shown the professional way to print making sure are final prints is the exact match as that to our monitor. 

We calibrated our monitors manually by going to the system preferences > display> color> calibrate. Adjusting the different ambient light settings on the monitor best suited. After the calibration we would get a before and after display showcasing the differences. Reasons for calibrating a monitor or laptop before printing because if your working with high quality images calibrating gives your monitor a better rendition of colour.

 Printing my Final two images for task 4

Within this workshop because we had not that much time I  managed to print one of my final two images within this session, and managed to print the second image the following day. As the friday the 20th is my shooting day for Tom, Lucy and myselfs dance video.


my final two prints the first being of Lucy taken in the style of Carravacio. Using the following color management profile.

R2880 photo glossy profoto rgb / colormunki imac calibrated imac/ photoshop cc manged spr 2880 photo glossy ./ rendered relative colormetric black 5760 16 bit.


The second final print taken from the view of my kitchen.   Using the flowing color management 

 R2880 photo profoto rgb/ photoshop cc managed spr 2880 photo glossy / rendered relative colormetric black point 5760 16 bit.


editing the image in Photoshop adding subtle adjustments to make the photo more interesting.


Sunday 22 March 2015

Photography Workshop - Portraits

17th February 2015

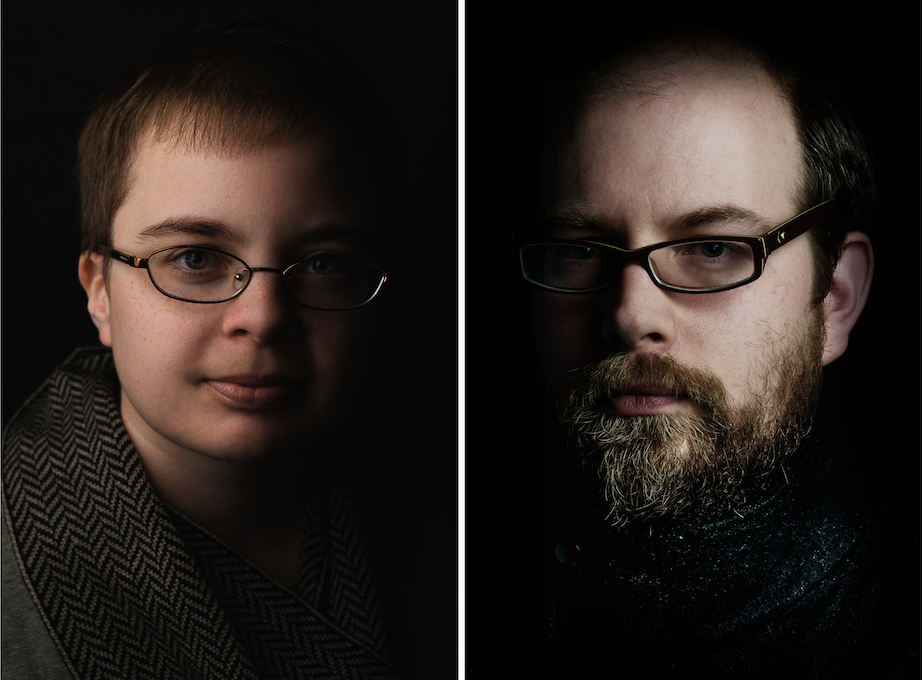
We had a studio session learning the essential skills needed for lighting a subject and using studio equipment to enable us how to capture professional photography portraits. The main focus was to learn how narrow and broad lighting is captured and used. This technique is used in many portrait photography to enhance the quality of the portrait or to either create a in-depth aesthetically pleasing image, or to bring out character in the face.
Before we started to take photographs we looked at examples of narrow and broad lightning:


This example of Scarlett Johansson depicting narrow lighting shows how it highlights her cheekbones and shows detail to her neckline, and the light in the eyes makes her look more aesthetically pleasing and captivating to gaze at.


This example of broad lighting shows how it highlights the features as a whole a lot more, rather than lining them with shadow, and how broad lighting illuminates the portion of the face closet to the camera.  

Then we took our own photographs :
Broad Lightning

Narrow Lightning
Now that we had gotten to grips with Broad and Narrow lightning , we started looking at this type of lighting in context to classical paintings. Aftet this short excercise we looked at broad lighting used by Rembrandt:
 
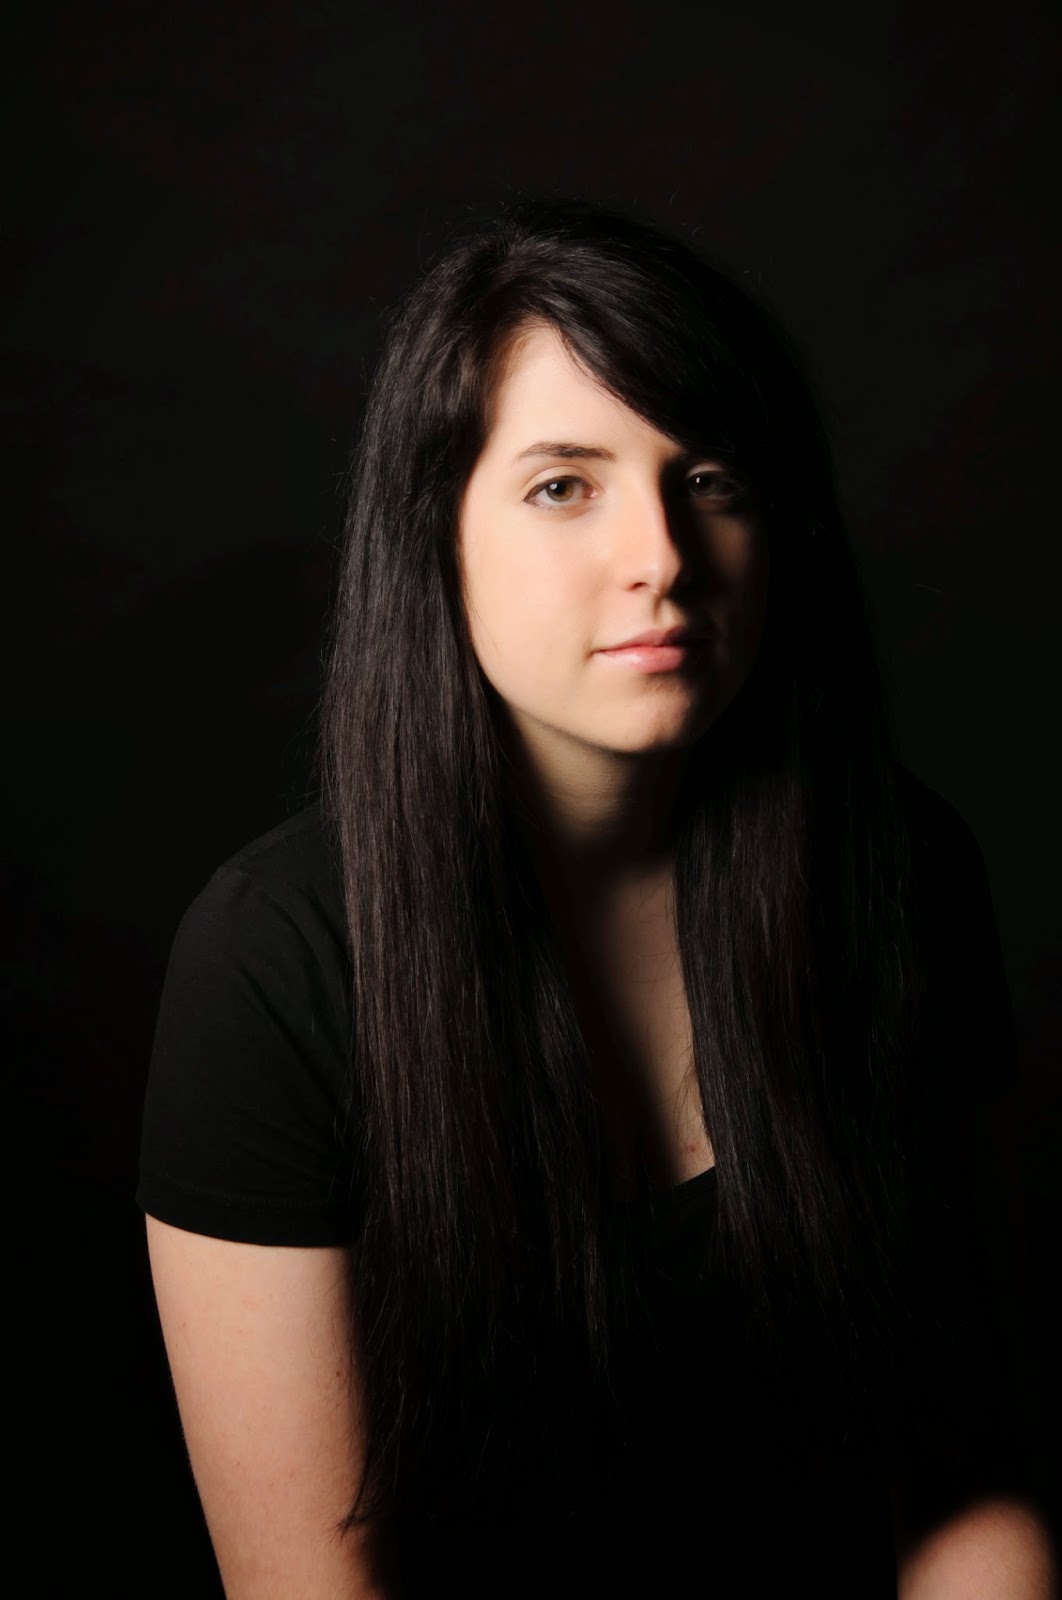
 Rembrandt was a Dutch painter that used broad lighting in most of his commissioned portraits. This is so that he could have consistency across his works, allowing him to capture the character of the person in the painting. This style of broad lighting not only casts a shadow on one side of the face, but also catches the light in both eyes as they look towards the frame. We were given the task of using one light to achieve this effect: 

This photo being taken outside of the workshop when Julia had gladly agreed to be my subject.

This effect took a while to get right, having to constantly ove the subject and the light around to get the right balance between the two. What I noticed was essential to this photograph was that the subject could not face directly towards the character as that is quite commercial, but also quite imposing and also how not looking directly at the character added a certain element to the photograph giving the photograph that a little edge.

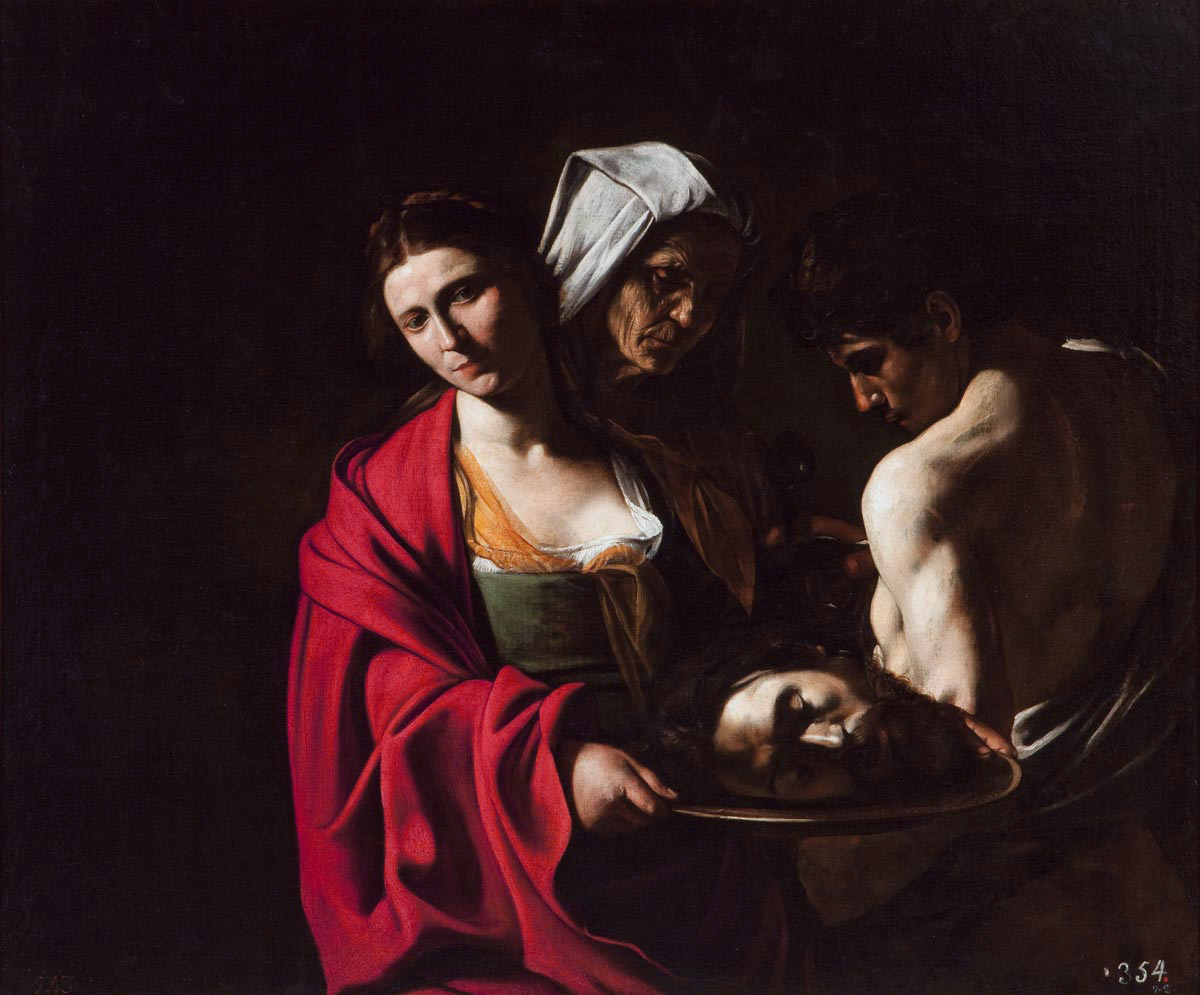
The second style we looked at was the style of Caravaggio, who was a Renaissance painter.  He used narrow lighting from high positions to create heavy shadows in his scenes, adding an dramatic heavy tension to his work.

For this excercise we had photographed students who had happliy volunteered  to act as our subjects as these where students from BA photography second years.


 What really excites me about this style of photography is the lightning how you could highlight te facial expressions really easily and get a twinkle in the eye which I feel makes the photograph more epic adding to the old fashioned painting style.


Friday 20 March 2015

Dance Video: The Shoot

20th March 2015

Shooting Day has arrived feeling exited. :)

Getting Starting / Set Up

We had picked up the equipment the day before so that we could get the Camera and Samurai blade ready and have the blade card formatted ready for shoot. We started by getting the equipment into the studio then started to set up the space. Myself and Tom were getting the camera, blade and glidecam ready. Lucy greeted Amelia at the reception to bring her in to the studio. We had extra support from the Elysian group with Laura, Lauren and Katherine helping out and being runners helping with make-up, timing and lightning.

Setting up the camera was straightforward since it was all ready and prepared from the previous day, the tricky bit was balancing the glidecam, getting the camera balanced on the glidecam took longer then we thought. So we decided to solve the glidecam balancing after lunch as the glidecam shots were after we had lunch.


The lightning was fairly easy to set up, however we had to be careful in that we made sure we filmed every light change, to avoid continuity.


Setup done shoots starts:

Everything was set-up, Tom being Camera operator we spoke as a group and decided to film all the master shots and mid shots of the entire dance, filming from both the manipulator's and the manipulated's performance. These being the split screens shots so the camera was locked off.

To keep the fluidity of improvisation Amelia our dancer would play her own songs, that would help her along with being given keywords for example body parts such as, bones/collarbone/ back/.    Improvising off these combined words to form a an improvised dance piece. With Tom handling the camera, with Lucy giving directions whilst myself saying these words to Amelia timing the words to maintain the an synchronized dance piece being easier for the next take as they were repeated in the same order.


After these master and mid shots, we filmed the close-ups and frontal shots these a being combination of handheld shots.
 
Our theory was that the dancer was confined to the frame, therefore the camera would not move and trap their performance. Thus when the dancer becomes fluid/loose she breaks out of the restrictions of the frame, then the camera would now follow the movements.
 
To help the dancer in knowing where the frame was we put an extra monitor pointed at Amelia, using the extra monitor as reference giving Amelia chances to experiment a lot more.


 For the technical and complicated shots we used green screen, adding markers on to the screen for easier tracking when in post.

Using a tape putting a line down on the floor using this line as mirror reference. We had shot all the shots from our shot list. So we then for extra material decided to  experiment with different lenses, camera angles and slow motion, filming about two hours worth of footage having a lot of material for us to work from.

End of the Day

Overall I was really happy with our shoot, and although we could have done with an extra shoot day, I believe that we can work with everything that we've got. It helped that we got extra help as we would have found it difficult and a bit tricky being a group of three however I am happy and confident that we have pulled it and that the extra help benefitted us. Lucy smashed it with finding Amelia, to work with a talented and collaborative dancer, who thought of this piece as her own and not as a job. This being my first dance video I would defiantly shoot this again. 
Interactivity - Further Customization


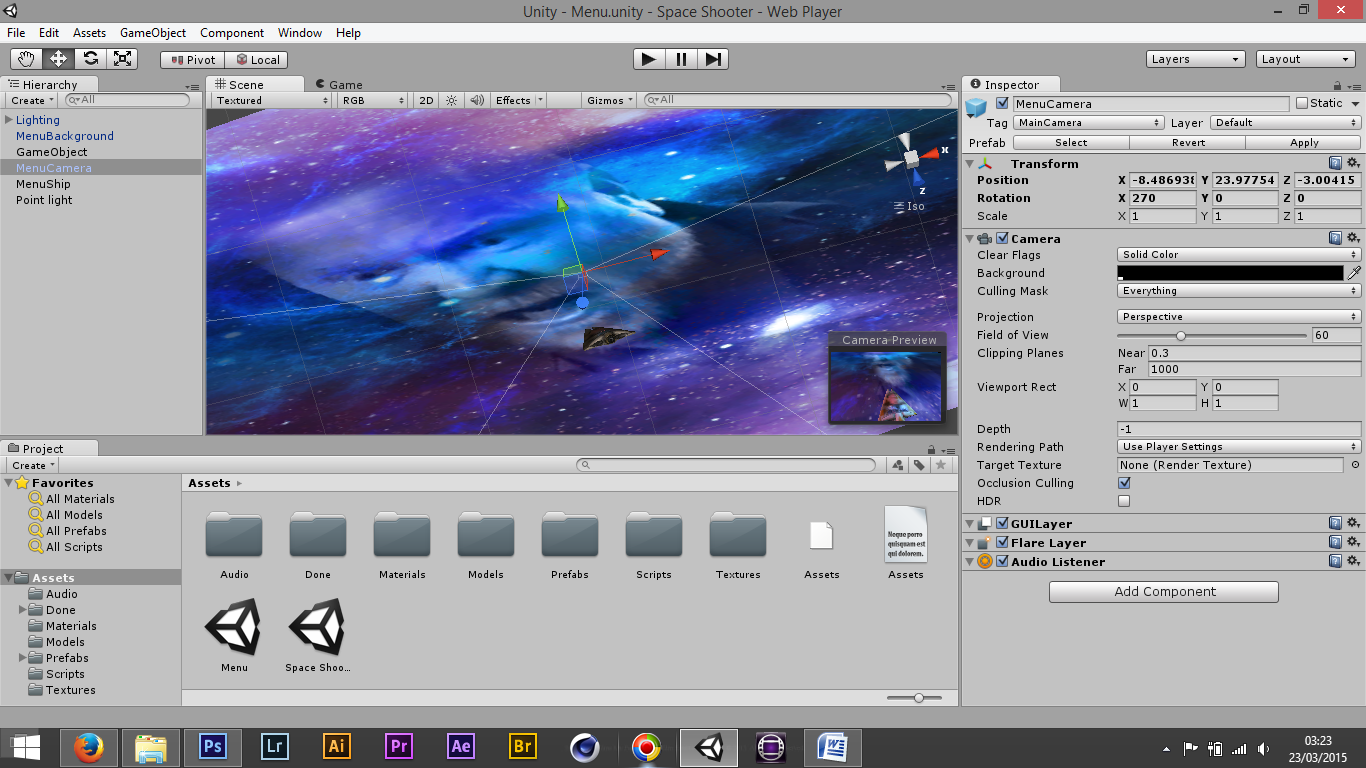
Adding a menu to create a menu i had to create a new scene. I created new scene > new game object the dragged the background on to the new game object. I then created a new script called menu and applied the script to the new game object. And also changed the background size and changed the xMin Xmax values so that asteroids and ship would pan across the whole screen.


script looking like this:


I then brought in the ship and dragged it on to the scene. Then i played with the camera to give a more close head view of the menu. the menu completed looking as follows-

 
Adding the Highscore this was the tricky bit which took quite a while to achieve. In the hierarchy panel i duplicated the score text and made a new script called highscore  the script looking like this
 
 
This was the tricky bit because when i attached the script to duplicated Guiscore text, when playing the game the score value would go up but the high score value would stay at 0. It took me while too figure this out.
So i had a further look and found the cause of the problem in the script where it says public gamecontroller above that i added a static int variable. Thus making the highscore work how this script works is everytime you play the game what ever score you get for example 25 and if die in the game the highscore works like that. So basically the highscore is implemented after every restart of the game.
 
and of course changed the music to the theme of Casaulty .
 
as you can see on the right hand side of the screen. Where it says Audio Source.
by going to inspector panel on the right side of the screen. Then Audio source the soundtrack being imported in after i downloaded it online.
Further customization i changed the asteroids size so that when spawning down different sized hazards would appear making the game more hard.
 
As you can the different sized hazards spawning i also changed some the asteroids colours these coloured asteroids are worth more points. how i went about doing this pretty simplistic.
 
in the assets folder in the prefabs > vfx folder where i stored the asteroids i duplicated the asteroids three times then dragged them in to scene view and resized them.
 

then in the inspector panel with blue asteroid picked in the panel in the destroy by contact script i changed the score to 5 so that this specific asteroid is worth more points. and then made minor tweaks in the destroy by contact script so that when you hit this coloured asteroid two times before claiming the points.
 
as you can see in inspector panel under the destroy by contact health script.

to change the color of the asteroid i clicked the asteroid in the bottom panel to where it displays a tiny arrow i clicked that to bring the second coloured asteroid up as you can see then in the inspector panel. Main color i changed the colour.


Interactivity - Customization


the first customization i made was making the background scroll i.e a moving background. I did this by making a new script called offset scroller.


To attach the script to the already made background and then changed the speed to 0.1 giving a smooth scroll in the background.

I then took the background in to Photoshop and took a few spaces images from the internet and blended the layers together to get that purple colored background.

using an EastEnders character making the game more fun and interesting.


Monday 16 March 2015

Auditons & Rehearsals before the Shoot

Thursday 12th March 2015 -

Casting and Auditions -

After receiving replies for our film we did two Skype auditions one with Amelia below and one with Caldonia below. We did one physical audition and during the audition we asked the dancer what they would like to add in terms of there of their own ideas and influence to the project, and also asked some practical things such as availability.

Amelia 

Caldonia


This is footage from the physical audition we done. ( Daisy Tait)

Daisy Tait was good, but we felt as a group that she seem passionate enough and didn't have enough enthusiasm for the project, same with Caldonia and that Daisy and Caldonia if we have of chosen either of them two they would have needed direction and their hand holded which we didn't have time for as we only have one day to shoot. Due to some complications in room booking and scheduling due to an anonymous individual.

We decided to cast Amelia Forrest as from her Skype interview she seemed really passionate and enthusiastic about our project and had a lot of her own input, which we as a group seemed really about to take on board and how she's part of an professional dance company.

During our Skype conversation with Amelia we  talked alot about collaboration, and how different art form could feed in to each other.

We also went through different film ideas and how to approach the idea, and how we'd like to structure it.

Overall, as a group we are extremely happy with Amelia, and believe she is a strong motivated, passionate and enthusiastic individual and fits for the part. I think Lucy smashed it in finding Amelia Lucy outdone herself in my opinion.


Monday 16th Rehearsals

On Monday we booked out JLO8 for our rehearsals where we met Amelia for the first time, and had a quick brief and greet of our new dancer. We as a group with Amelia had a discussion about trying out a few things i.e. movement, visual effects and costume. Footage from the rehearsals.


A quick VFX experiment which Tom had done on the day, to see weather the idea would work. in my opinion it looks good and am looking forward to shooting the film.

Tuesday 10 March 2015

Interactivity 5th session

We started this session off with creating a new script to destroy our object.

 Script looking as follows


However, since the OnTriggerEnter is checking for all collisions, the asteroid dissapears instantly. To fix this the script was adapted to the following


when the asteroids come in contact with bolts upon fire we created a explosion effect In to the script the script now looking as follows


The next step was adding a boundary box to the game so that the asteroid would spawn in off screen.


 The script looking as follows


to get our asteroids to spawn multiple times on a continues loop we added to do the script


Monday 9 March 2015

Dance Presentation- Project Proposal


Project Proposal

Dance Video sign off.
Thursday 5th March 2015 - Room R19
Rosie Gunn & Rachel Palmer

Production Pack

 compiled by Tom with help from myself and Lucy

Final - Storyboard


As the rough storyboard concept was just a draft to show how our dance video will look like roughly, Lucy then came up with a shot list from inputs I had roughly run past her for me to draw to up final storyboard.


Here is the final storyboard devised from the shots created by Lucy and partial inputs from myself.
taking references from the films that we had watched from our dance workshops and workshops from Field and Frames :
https://www.youtube.com/watch?v=9bXWWz5Tv_I
http://youtu.be/oQCTbCcSxis
http://youtu.be/gvyU9ZchEXE
http://youtu.be/yfJEVAVR6o8


Wednesday 4 March 2015

Dance Video - Learning agreement form

From doing three previous agreement forms for my last project Maps & Journeys, it has helped me to write up a detailed and descriptive agreement form stating what I what I want gain and achieve from this dance project.


Dance Video - StoryBoarding Rough Concepts

when Tom, Lucy and myself got together to discuss the individual roles we were assigning each other. I of course because I love to draw am a more creative person I volunteered and was assigned by Tom and Lucy to draw up a rough storyboard, so as we as a group had rough idea about how the film may look.

A rough sketch -


when presenting this to Rachel at our second tutorial, she really liked the storyboard and the wide establishing shot but also said we needed to consider the space and objects within the space and weather these things will impact our film.
 
notes taken from the second tutorial we needed to consider -
 
-Try braking everything down to scenes and tasks
 
-ask that the dancer is confident with improvisation and ready to develop dances with us
IMPORTANT


-Think through the type of dance, and break down each individual bit of the synopsis line by line
explain that the reflection is a metaphor for the true self.

Synopsis we needed to break down line by line -

In a dark minimalistic room we see a person dancing using repetitive, monotone in nature and constrained movements, as if stuck in his daily routine without any hope. However his mirror reflection tries to convince him to break out of his routine, at first with no result as the person tries to ignore his reflection. However as the film progresses the person will slowly “break free” from his former self, starting to incorporate fluid movements in to his monotone routine, eventually ending up fully on dancing and leaving his past self behind. At the end of the film, both person and reflection become actual mirror images, as if the person has finally found his true self.
 

Interactivity 6th session


To start off we created a script to destroy our explosion prefabs after they've been exploded.


Next it's was time to add some audio to our game. This is done with an audio source component through the inspector panel


Also we added some background music to the GameControlergameobject.

and alsoaddedsome score text. We did this using a GUIText component on an empty gameObject.

 We then set up our scoring values through the game controller script by adding in modifications. The script now looking as follows with added modification.


now the game is finished it is now time for the exciting part and customizing the game.