Monday 23 February 2015

Silent Woods - Evaluation.


Learning avid and its capabilities, having taken this unit as one of my three. Avid has broaden my mind about editing, and how I will use avid for future projects to develop my knowledge of avid further then I do now. This exercise in editing the Silent Woods project has been interesting, it has made me realize the hours and effort actual film industry go through to create a well professional well edited film. My version of Silent Woods may not be perfect as there are minor continuity errors and minor sound errors occur. However that's why I want continue to use avid, as I believe using avid will improve my editing in the long run to come.

However from editing the Silent Woods I have learnt more short cuts in avid to make editing much easier next time when using avid which are the following  -

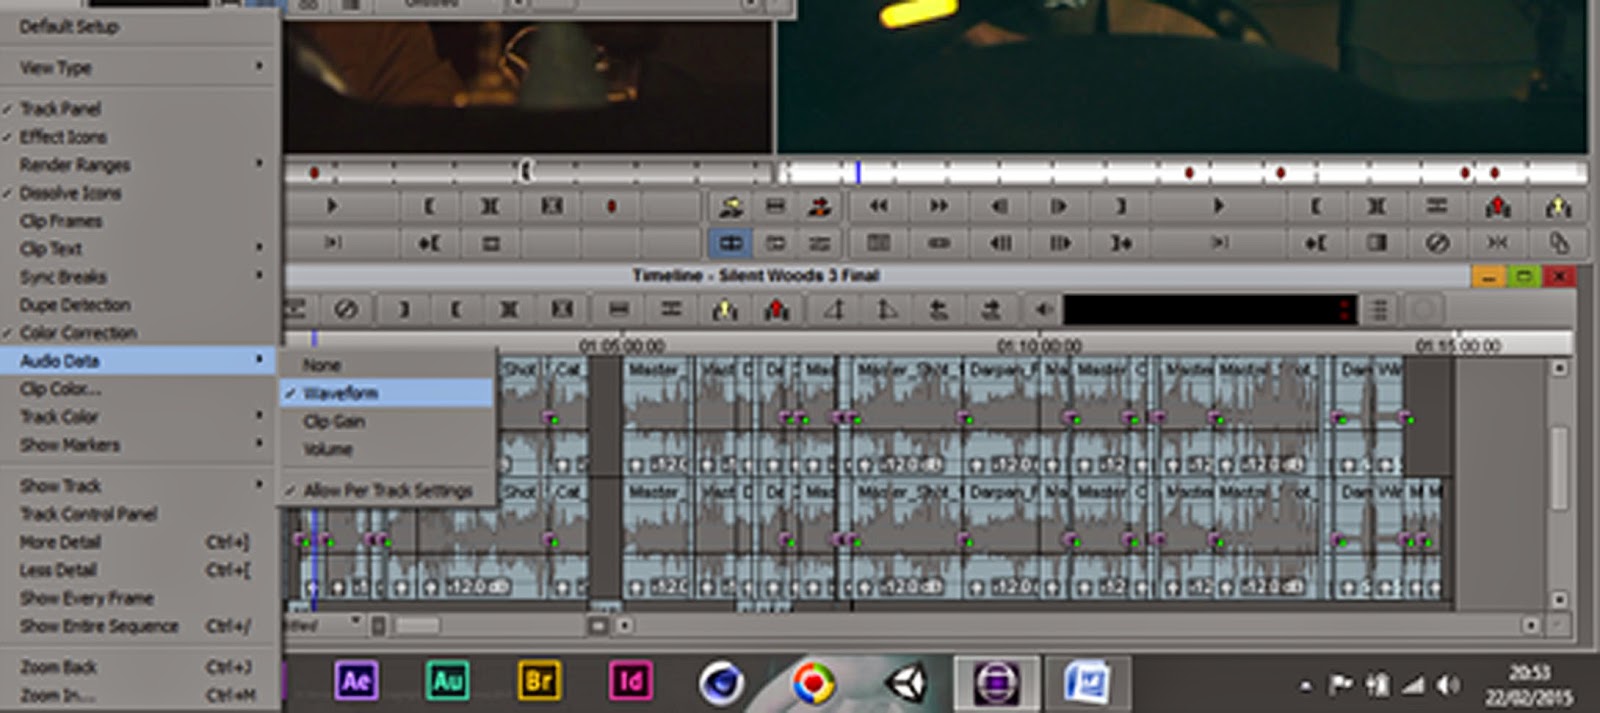
- Hold Alt/Opt when clicking a track color & the colors window will open > this allowing extra colors when coloring the timeline tracks.

- Alt + Ctrl/Opt + Cmd + U > this allows you to insert tracks in the middle of the sequence and not at the bottom or top.

These are just small short cuts which I have picked up on during this editing process, by playing around with the software the more playing around I do the more I will pick up on.  From the things that i know about avid from own research and from the avid training I still have lot of playing around to do with the software and research as this will improve my knowledge of avid further.

Overall I believe the silent woods could have been edited better having had the avid training, however I will continue to use avid and do future project edits so that I could gain a better understanding of the software, so that I can edit my future works to a high standard.

Silent Woods 11- Exporting the Film

I went to file Export  chose the setting the 'send to QT Movie'. I then went to options  changed the width and height to 1920 x 1080, aspect ratio to 16:9 square pixel.  then went to format chose DNxHD codec. Under the video settings I changed the compression to NONE and resolution to 1080p/25 185 10-bit  at 25fps.

 
I went to format options to bring up the standard video compression settings then changed the format of the video before exporting the final video out. 


Silent Woods 10


Bars and Clocks, tones

I created a new bin named ' Bars and Clocks' I found the clocks and bars on the local C drive from the avid suite room w110.  I created a new title to fill out the clock information.
 

To find the bars I accessed the local C drive in room w110 and found the bars under  AVID > SUPPORTING FILES > TEST PATTERNS > HD_1080  and chose the file sample Bars. Tiff and Bars.pct just to make sure I didn't have the wrong bars as dragged this file on to my external drive to work from home I then imported the bars into the bin.

For the bars I needed to create the Tone I did this by going to TOOLS > AUDIO TOOL or you could bring up the audio tool by pressing CTRL+1.
I selected PH > create Tone Media, this bringing up the media level , setting the level to -18, saving the tones in the Bars and Clocks bin.


Silent Woods 9

To create the title for the silent woods I went to  TOOLS > TITLE TOOL APPLICATIONS


Enabling the V button which allows me to see the background .

I used the Fill to change to text from white to yellow. When you exit the title tool it asks where you would like to save your title in to I created a new bin named credits -  Title and put the text in to this
 
To edit the title after it has been saved you select the title in timeline then go to TOOLS > EFFECT EDITOR .


Silent Woods 8 Colour Correction


I created a new video track so that the color correction I applied would appear as a filler on the new track.
I went to the windows workspace and went to color correction which would then make my workspace appear as the following -
Or you could click this symbol for the correction the second symbol above the key frame symbol.
I started off by choosing the clip I wanted to color, I then using the four color wheels shown above adjusted the SHADOW,HIGHLIGHT,MIDTONES and the MASTER to get the color I wanted. Using the waveforms on the TV LOGIC  this enabled me to keep track of my color correcting as this indicates the black and whiteness of my image so the color that I wanted to use, I had make sure that it didn't exceed the boundary box. In all these images the graph shows how the bottom part is the black and the top half is the white so any color I use these different waveforms acts as guides making sure the color remains balanced.
                                 Before                                                                   After
After you've applied the color to one clip and to save time you can save the color you made as an template and it will then ask you which bin to save it then. You can then drag the color template on to any clip and the color will be applied, and an green line across the clip will appear indicating a color has been applied to the clip.


Silent Woods 7


Applying the same effect as I did to the sounds but this time I added films fades to the video tracks to smoothen the cuts when going to the next frame.


Ready to apply transition to the video track.

When splicing video segments onto the timeline the cuts between the different frames in certain footages seemed off a bit so to fix this problem I used the dual roller trim and extract function.


I wanted to shorten the A-side of the clip in the timeline, making the B-side longer, still maintaining the sync of the two.  So I used the Dual Roller Trim function, by CTRL clicking on the clip I wanted by holding down CRTL it takes me to the specific start frame of the clip I wanted to shorten until a pink line appears. I dragged this to the left to achieve the look I wanted for the edit. Thus reducing the A-side and extending the B-side. Fixing the other clips in this same manner.

Silent Woods 6

In the timeline you can see gaps these gaps being the extracted  sound that I took away because they had unnecessary noise and little glitch thump noises which needed to be taken away. So using the wild track from  the soundtrack bin loading it into the source monitor I marked IN and OUT points and deselecting the other tracks I overwrite the specific sound that I wanted in to the timeline beneath on audio tracks 3 and 4 which is why the timeline is looking the way it is.

To smoothen the sound out on the Silent Woods film, to keep it consistent and making sure the sound doesn't go above -12. To do this i went to TOOLS  > AUDIO MIXER  and then added a compressor to the master track once something is applied to the master track it is applied to everything else.

I then ganged the audio tracks as you can see the highlighted blue squares this indicating if you change the sound on A1 the sound on A2 also changes making them  act as one.
To make the sound more smoother enlarging the timeline by pressing CTRL + L so I could get a better detailed look at the timeline going to the fast menu > Audio Data > waveforms. Then holding down shift and dragging the mouse across the timeline allowing me in a fast pace to skim through the sound waves this being an easier and efficient way to pick up any unnecessary  sound.


lastly but not least I added dissolves between the audio tracks to smoothen it out getting rid of the small ticking sounds between the tracks. Which works well.


Silent Woods 5


I  then started to go ahead and cut in the footages that i wanted to use with my timeline now looking as the following -
Before reaching this stage if you look through my project and the bins you will see that the above image of my timeline is my final Silent Woods sequence which I have named version 3 final in my project in the sequences bin.
 
I could of have just duplicated the sequences but I created a new sequence and started fully again as I wasn't happy with my version 1. However  I created version 2 at the university campus in the avid suite and when opening the sequence up at home the sound didn't work so I created a new sequence and copied and pasted the sequence from version 2 into version 3, when playing the sequence back the sound worked so I decided to work on the version 3 as my final edit. Due to sequence not recognizing the sound as it was from the end drive from the avid suite room then when pasting it in to the version 3 sequence it recognized the sound from my external drive.
When cutting in the footages i wanted to use you can see from the timeline red dots. These dots are markers


To get this marker in the source monitor there's this red overall symbol which allows you to make marks on specific parts of the clip which acts as little reminders I used markers on specific footages and labeled them as USED so that I wouldn't use the same clip again, this way being more organized.


Silent Woods 4


Because the clips within the timeline that i have chosen between some cuts there are unwanted clips that I don't want to use. To get rid of these clips that I didn't want I marked IN and OUT points on the clips I didn't want then pressed the Z as this lifts the clip away then, with the clip lifted I used the short cut B to overwrite the new clip in. Alternatively could have just overwritten the new clip in. The blue highlight indicating the portion of the clip I want to replace.


Master Shot.

I used this same process with the sound, using the wild track i selected specific part of the sound that wanted to remove however i couldn't overwrite it over the old track so i created a new audio track CRTL + U then spilced the wild track that i wanted to use onto the new created audio track. 
 
 
before

 
after 


Saturday 21 February 2015

Silent Woods 3


In the previous post i mentioned i  made IN  and OUT marks around the clips on the timeline using splice-in or overwrite depending on the cut i wanted to make.  However previous to this part i looked through the individual bins and looked through the different clips and spliced in the different clips onto the timeline using the shortcut tool V, having my rough edit now looking as follows.


I had noticed that the sounds throughout the clips had unwanted noise between the different cuts. So to get rid of these noises i turned on the waveforms through  FAST MENU > AUDIO DATA  > WAVEFORMS.


Using segment mode EXTRACT/ SPLICE IN  to remove the unwanted noise. Also adding by deselecting the other tracks only keeping the audio tracks selected adding  dissolves between the audio tracks to smooth the sound.


The little green square indicating it is an rendered dissolve effect that has been applied to the audio track.